Welcome to The Studium!The site is currently in early release as I continue to work on it and add content. Feel free to join the Discord to ask questions and contribute if you'd like! - Sonicrida

9th Circle Savage - Kokytos (WIP Guide)
Welcome to our guide for the 10th Circle (Savage) encounter. The full guide is a work in progress but this page is a great way to see the various strats and guide videos popularized in the community as well as a preview of what to expect from guides in Dawntrail!
9th Circle Savage - Kokytos
"Why are we playing Soccer?" - The Warrior of Light
Pandæmonium: Anabaseios - The 9th Circle (Savage) - Kokytos
The 9th Circle (Savage) - Kokytos is the first fight of the Anabaesios tier of Pandæmonium in Endwalker. In this fight, you'll want to decide on clock positions as well as using markers to designate the various spots and directions that can be used in the encounter.
The fight also features light party mechanics so it may be helpful to mark the healers. (Keep in mind that healer markers may make it harder to see the limit cut markers used during the fight)
- Unique Mechanics
- 13
- Tankbusters
- 3
- Raidwide AOEs
- 16
- Time Limit
- 9:58
Tips For The Fight
Some quick tips to remember before the instance. Helpful if you're new or experienced and need a refresher!
- Levinstrike Strats
Keep in mind that both Oppo and Krile are interchangeable while JP does not work with either of them.
- Identify Your Color Spots
You need to know where your clock spot is in addition to the matching color partner spot because you need to keep track of both throughout the fight for various mechanics.
- Healer LB3
Healer LB3 can save a clear but beware that using this during LC2 can be very risky because there's a high chance that people won't get into their spots before the Two Minds cast finishes which can lead to a wipe very easily.
- Tank LB1/3
For the tanks, LB1 can save the party from a wipe on Archaic Rockbreaker if some peopl ehave died making it harder to soak the stacks. (Light Party stacks after first cracks mechanic)
- Body Checks
This fight has a lot of body checks and a lot of things can go wrong if even one person is dead. It's a good idea to keep people topped off because there are also a lot of back-to-back raidwides. If you're a DPS, learn when they happen and liberally use personal and party mits in addition to personal healing tools.
- Interchangeable Mechanic Names
People will use different words to refer to the same mechanics.
- Dual Spell Lightning = Protean
- Levinstrike = Limit Cut 1
- Chimeric Succession = Limit Cut 2
- Meteor Bait = Beastly Bile
- Lightning Bait = Thunderbolt
Video Guides
Video Guides
Hector's Animated Guide
Hector's guide is often referenced in party finder so it's worth knowing the strategies mentioned in his video. Keep in mind that party finder has two major strategies which are covered in a separate Hector Video you can see below.
Joonbob's Oppo Levinstrike Guide
If you're using the Oppo or Krile strat, this video is for you. It has both an animated and gameplay example of how to perform both parts of the mechanic.
Hector's Levinstrike PF Guide
Hector's video focused on the 2 popular strats used for levinstrike, in party finder. Keep in mind that while the video features 3 but Oppo and Krile are mostly the same.
Lian_Ark's Cracks/Martialist Safespot Footage
Tons of good angles for studying the cracks mechanic showing where to stand.
Setup
You should first assign clock positions for the party. It's common to have markers placed around the arena on the middle circle which is what you can use to determine any mechanics that rely on this. You can use these positions to determine your light parties as well.
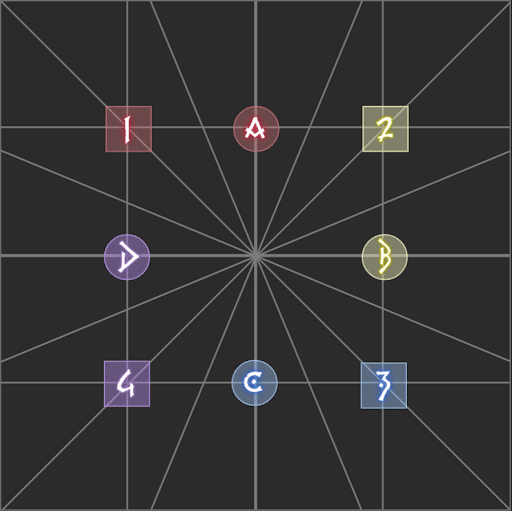
You'll want to pay attention to what color your waymark is as well since you will use this for any paired mechanics. The fight features mechanics where either supports (tanks and healers) or dps will rotate. Typically supports have the rotating responsibility so that dps can focus on uptime with positionals.
Notice that the 1 Marker is in the NW position. This allows for 2 to be in the NE which is used for a mechanic later in the fight that marks players with numbers (Limit Cut 2).
If needed, make sure to either have a chart visible on a second screen or macro ready if you need to remember the order for tower soaking and fire spreads for the Levinstrike mechanic. Some players also like to have a macro to announce the rotation direction during Levinstrike. This can be helpful for players who forget which way to rotate after the orb markers disappear.
Gluttony's Augur
Raidwide Damage- Healers: Mitigate and heal after
- Party: Mitigate
Ravening
Raidwide Damage- Healers: Mitigate and heal after
- Party: Mitigate
Another raidwide AOE. This attack is delayed and happens a few seconds after the castbar finishes. The damage will happen after Kokytos chomps on the crystal that is floating. Each Ravening is accompanied by a new buff on the debuff on the boss that signals which mode the boss is in. The first of which is the Blue or Mage mode.
The actual damage portion of the ability is called Soul Surge.
Duality of Death
Dual Tankbusters TankSwap- Tanks: Use cooldowns and swap aggro after castbar starts
- Party: Mitigate
The first mechanic of the Mage phase is a tankbuster that targets both tanks and hits twice. Note that each tank is hit with a different element which also gives you a debuff to that element's resistance. This means that you cannot take the same element twice. To resolve this, you must swap aggro once the cast starts so that the targets swap between the hits. If the aggro is not swapped quickly enough, both tanks will die.
The tankbusters have a moderately sized radius so the tanks should not be standing too close to each other. The rest of the party should also not be near the tanks to avoid being hit. Often, the Off-Tank will position on the front side of the boss and off to the side to not get in the way of any melee positionals.
Dual Spell
Raidwide DamageDual Spell TLDR
Dual spell is 2 of 3 colors and one is always Ice
- Fire = Pair Stack Position
- Lightning = Spread/Clock/Protean Position
- Ice Empowered = Inner Circle otherwise always stand on the Middle Circle
Dual Spell is a mechanic that deals damage to the party based on which elements are visible on Kokytos' hands as the cast is happening. Let's break down how this works because there are a few components to it. First, let's start with the elements.
- Fire: Targets either 4 DPS or 4 Supports with AOEs. Lethal if hit by more than one. The role being targeted is not telegraphed so we use pairs of one healer and one dps stacked together to safely resolve this. The goal is to prevent the AOEs from overlapping so each pair should be standing as far away as possible from the other pairs.
- Lightning: Targets players with line AOEs originating from the boss. We resolve this by having each player standing away from each other using their assigned clock positions. Often referred to in the community as "Protean"
- Ice: A Donut or Dynamo AOE that requires the players to be within the circle to survive. You will die if hit by this.
An important thing to know is that one element will always be Ice. This means that you will always be resolving a donut regardless of the other element. Dual Spell is always "pair stacks in the donut" or "clock positions in the donut". The other half of this mechanic is that one element will always be empowered which increases the size of the spell being casted.
You can determine this by the symbol that flashes on your screen. The symbol will match that of one of the two elements being casted. Kokytos will also use different voice lines depending on which element is empowered. This can be useful if you have trouble seeing the colors of the symbols.
Fire: "Flame take you!", Ice: "Ice bind you!", Lightning: "Now fall!"
The empowered element gains increased size. To put it simply: The Ice ring gets bigger which means the safe zone is smaller. Most parties will have their markers on the middle circle. Ice empowered means you'll stand on the inner circle while still resolving either stack or spread depending on the second element. If ice is not empowered, you will always stand right before the edge of the middle circle because the fire circle AOE or lightning line AOE is bigger which demands more space between the players. To summarize, this mechanic is always solved by determining if it's spread or pair stack and then if you should be standing in the inner or middle circle.
The last thing to know about the mechanic is that it appears throughout the fight sprinkled in with other the mechanics. The first appearance is 3 dual spells back to back. These 3 will always be in the order of fire + ice, lightning + ice, and then finally fire + ice again. The empowerment is of the third is always the opposite of the first as well. Lightning is always a random empowerment.
Note: It is hard to survive this mechanic when even one person is dead because it can often lead to overlapping so make sure that people are alive before the mechanic starts.
Ascendant Fist
Tankbuster TankSwap Damage-Over-Time- Tanks: Use cooldowns and swap aggro during castbar since MT gets a physical vuln debuff
- Party: Mitigate
This is a simple tankbuster + DoT. Mitigate accordingly. It requires a tank swap since this also applies a Physical Vulnerability Debuff.
Archaic Rockbreaker AKA Martialist 1
Part 1: Knockback + Pair Stacks
Raidwide DamageMartialist 1 TLDR
- Pair stack to be knocked into the wall from your color quadrant
- Dodge first set of line explosions, Front/Rear Combination, and the in/out aoe all at the same time. (Can Dodge Front/Rear Combo immediately after the line explosions). Use sprint if needed.
- Dodge second set of line explosions and whichever AOE didn't happen in the first step. If it was a point blank aoe first, it's a donut second.
- Split into light party groups on either side of Kokytos and prepare to mitigate and heal 2 back to back raidwides
Kokytos will create walls evenly spaces around the edge of the arena. These will either line up with the cardinal or inter-cardinal directions. Kokytos will channel a knockback and you must use a wall to stop yourself from being knocked out of the arena and killed. For this, you must get knocked into the wall that matches your the color of your assigned marker. Be careful to not stand in the center as this will do lethal damage.
For example, if your clock position is on 1, there should be a wall behind either the A or 1 markers. That is the wall that you should be getting knocked into. Immediately after this, either all DPS or all Supports will be targeted with a rock that spikes from the ground. This damage needs to be shared. We use pairs to resolve this because taking more than one rock will kill you.
Be careful with dashes here. Many players will use their dash after being knocked back to maintain uptime. If you do this and your pair stack partner doens't, it may kill them since you will move out of range to share the damage. Please be mindful of this.
Part 2: Cracks + Front/Rear Combination
This is one of the hardest parts of the fight! Three mechanics happen next and you must resolve all at the same time. First, we have the cracks in the ground to worry about. If you've done the Ruby Weapon fight, this should look familiar. There will be 12 cracks on the ground coming from the center of the arena. 4 shorter cracks and 8 longer ones. These cracks will light up like fuses. Once the light hits the tip, a large explosion will occur around that area. That means that to be safely away from a short crack, you'd stand near the edge of the arena. The the long cracks, the safe spot would be towards the center.
To resolve this mechanic, you must find a safe spot that is away from every crack explosion. The tricky part is another mechanic is also happening. While the lights are traveling to the edge of the cracks for the first set of explosions, you will see a telegraphed aoe. This will either be a ring around the edge of the arena or a donut centered on Kokytos. You must dodge this aoe at the same time as the crack explosions which drastically limits the amount of safe spots you have available. This will then happen again with the opposite attack during the second set of crack explosions. If you were in for the first aoe, you go out for the second.
While all of this is going on, Kokytos will either cast Front Combination or Rear Combination. It's a simple cleave that hits half the arena. To survive you, simply go to the opposite of where the attack is directed. While this mechanic is simple enough, the problem is that you have to dodge both the cleave, the donut/ring aoe, and the crack explosions at the same time.
We'll break it down to make it easier. The mechanics happen in this order:
- First set of cracks explode in addition to either an aoe on the edge of the arena OR in the center.
- Front/Rear Combination cleaves half the arena
- Second set of cracks explode + Whatever AOE didn't happen earlier
The most important thing to remember is that you have time to run to the safe spot for Front/Rear Combination regardless of where you stand to safely dodge the first cracks. Sprint can help here! Identify the nearest safe spot for the cracks and then move to the safe spot for the Front/Rear Combination immediately after the cracks explode. As you move, pay attention to the second set of crack explosion lights. There will be only 4 this time so it's much easier to dodge. Keep in mind that another AOE still goes off at the same time as the second set of cracks. If the first was a donut, the second will a point blank AOE.
Archaic Demolish
Raidwide DamageImmediately after the second set of cracks explode, Kokytos will prepare to case Archaic Demolish. This targets each healer with a shared damage aoe. We use our light parties assigned at the start to resolve this. Typically, group 1 will be positioned west of the boss and group 2 will be positioned east. Getting hit by 2 of the explosions will kill you. Mitigation is important for this it hits hard. Kokytos will case Gluttony's Auger right after this so healers have to be ready to heal up before the second raidwide hits.
If one healer dies during from the martialist phase, a tank limit break can potentially save the party so keep this in mind for prog scenarios! After this, Kokytos will followup with another Ascendant Fist and eventually a Ravening signalling the start of the hardest mechanic in the fight.
Levinstrike AKA Limit Cut 1
Limit CutLevinstrike is a very hard mechanic with a lot to go on. It's often considered the major prog point of the fight and it's where people will see most of their wipes in p9s. In party finder, two major strategies are popular and I will attempt to explain how the mechanic works first before diving into both of the strategies. Pick which one your party is using. Let's break it down!
The Markers
A lot of things happen at once in this mechanic. Kokytos will evenly spaced walls similar to the ones in Archaic Rockbreaker. Each of these walls will have a purple orb near close to it. At the same time, 8 markers will appear. 4 of these will randomly be assigned to players and 4 will be assigned to the orbs. The orbs always recieve odd numbers and the players always recieve even numbers.
The orb markers will always be arranged in a way where the numbers will increase from 1 to 3 to 4 to 7. The direction can be either clockwise or counter-clockwise. The mechanic effectively happens based on this order so paying attention to where 1 is and what direction the markers are positioned in is very important.
Numbered Players
The other 4 markers (2, 4, 6, and 8) will be randomly assigned to 4 players. This order helps us to determine the order in which each player has to resolve their mechanics. Kokytos always starts by moving behind the first (orb marked with 1) orb. It will then kick it across the arena. After kokytos kicks the 1 orb, it wil jump to the player marked with 2 causing damage in a small aoe around that player. This attack is called Firemeld. This deals more damage the closer you are to Kokytos so you want to be as far as possible from it before this attack hits. The pattern then repeats: kick the 3 orb, jumps to the player marked with 4, kicks the 5 orb, jumps to the player marked with 6, and so on until all orbs kicked and all marked players have been hit by the jump aoe. Now, let's briefly explain what happens to the unmarked players.
Defamation Markers
The 4 unmarked players will be one by one marked with a blue circle above their head. This is referred to as a defamation marker. After a short amount of time, this marker will detonate in the order that they were placed on the players creating a large damage aoe in a circle centered on the marked player. This aoe is large enough to cover almost the entire arena if centered so we try to create as much distance as possible from the explosion and kokytos while making sure not to hit the party as well. The damage portion of this attack is called Icemeld.
Towers
There is one final component to this mechanic. After the orb is kicked, it always gets kicked directly across the arena. It will hit the wall on the other side and cause a small explosion. You must not get hit by this explosion. It won't kill you by itself but it will cause you to die from what happens next. After the wall is hit, a tower will spawn where the impact was. This tower must be soaked otherwise it will cause raidwide damage to the party which will lead to a wipe. Soaking this tower gives a magic vulnerability up and causes damage which means that you cannot take this immediately before being hit by Firemeld otherwise you will die.
We generally resolve this by having the defamation marked players focusing solely on detonating their markers away from the party. This means that the players marked with numbers handle both the tower soaking and the firemeld aoes. Regardless of which strategy you use, the idea is that the defamation explosion means that roughly half of the arena is safe at any given time. We position defamations to that a tower is never appearing within the radius of a defamation. At the same time, the placer with firemeld will be moving to one of the two safe open edges of the arena so that they are. These edges will always be on the opposite side of the defamation explosion as well since otherwise you will get hit by both and die.
As kokytos rotates around the arena, the party moves accordingly so that each defamation can explode safely while each tower can be soaked without overlapping any of the attacks. Since the player marked with 2 gets jumped on with Firemeld first, they cannot soak the first tower because of the magic vulneability debuff or they will die. If the player marked with 4 soaks the first tower, they will still have the debuff by the time that their Firemeld hits. This is why we use the 6 marked player to soak the first tower. We then go in order after this to resolve all of the tower soaking.
Because of this fact, both strategies rely on the same order seen below:
| Order | Tower | Firemeld |
|---|---|---|
| First | 6 | 2 |
| Second | 8 | 4 |
| Third | 2 | 6 |
| Fourth | 4 | 8 |
Now, let's talk about the two main strategies you'll run into in party finder: OPPO, and JP.
Oppo
JP
Raidplan Link - https://raidplan.io/plan/FeOtS0Tri0FSalXm
The JP strat works by assigning a static spots for all non-tower mechanics as well as a place for the party to stand at all times. Compared to oppo, this strategy is notable for having less movement while notoriously being trickier for the player marked with 6.
Macros
Levinstrike/Limit Cut 1 Macro
(Click anywhere to copy)
(Click anywhere to copy)
/p Tower | Out
/p 6 | 2
/p 8 | 4
/p 2 | 6
/p 4 | 8
You can use this macro when limit cut 1 starts so that people aren't confused about the tower/out order
Extra Info
Loot
- Ascension Earring Coffer (IL 660)
- Ascension Necklace Coffer (IL 660)
- Ascension Bracelet Coffer (IL 660)
- Ascension Ring Coffer (IL 660)